
Welcome to the magical world of fermentation, where bacteria,, time, and, in this case, salt, work their magic on a rather plain vegetable: cabbage. Learn how to turn a head of cabbage into a superfood condiment to improve your gut health.
Jump to RecipeBenefits of Sauerkraut
I’m convinced that naturally fermented sauerkraut is a super food. The living probiotics in sauerkraut that has not been heat treated go far beyond any probiotic supplements you could take for gut health. Good gut health is related to reduced inflammation in the body, better mood, better focus, a better functioning immune system, and an overall feeling of well being.
Sauerkraut is high in vitamins, minerals, and fiber. A little goes a long way, especially if you are just starting out with fermented foods. Having too much too soon (more than a tablespoon or two) could backfire (literally) and cause digestive distress. But having small amounts every day can do wonders for your gut health and overall well being.

How to Make Fermented Sauerkraut
It’s been a while since I’ve made my own sauerkraut. Part of the reason was living abroad and keeping things simple, part of it was we moved a couple years ago and I couldn’t handle extra kitchen projects until we got through the bulk of our house projects, and the other part was the fact that I had a histamine intolerance due to mold in our basement. If you know anything about histamine, you know that fermented foods are out. But, thankfully, I can now tolerate small amounts of fermented foods, so it was time to pull out the crock my mother passed on to me years ago.
And I’m so glad I did. I forgot how easy it is to ferment cabbage. I love the simplicity of shredding it, salting it, and then letting time do its magic.
I usually get my organic cabbage from Misfits Market. Misfits Market is an online grocery store that is dedicated to ending the cycle of food waste. They “rescue” produce that would otherwise be thrown away and deliver it straight to my door. I love that I can build my box based around what my meal plan is, and it arrives to me a few days later.
I used a food processor to speed up the shredding process, but you can also use a cutting board and a sharp knife to thinly slice the cabbage. The ratio of salt to cabbage is 2% when making sauerkraut. The total weight of salt should make up 2% of the total weight of shredded cabbage. To figure this out you would weigh out in grams the total weight of your cabbage after it is cored and shredded. Then, multiply that number by .02. In my case, my shredded cabbage weighed 1260, and when I multiplied it by .02, I got 25.2. I just rounded down and used 25 grams of salt for my sauerkraut.
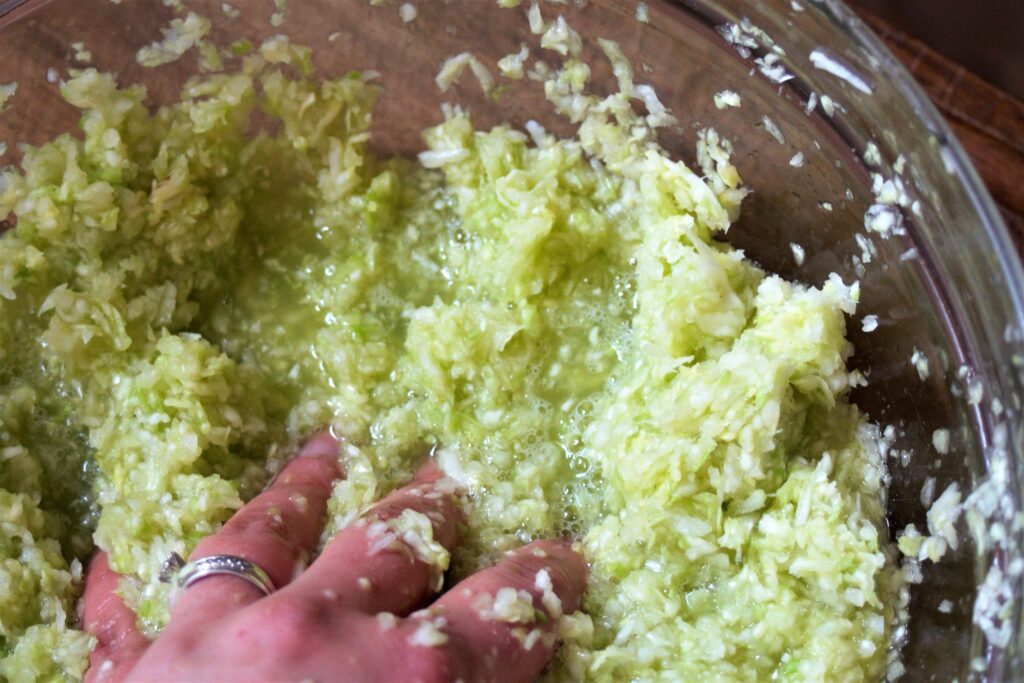
If you don’t have a food scale, you can follow my recipe below and adjust the portions as needed. My cabbage produced 11 cups, and to that I added 5 teaspoons of salt. After sprinkling the salt on top of the shredded cabbage, use your hands to really work it into the cabbage. After a couple minutes of squeezing and pressing, a brine will develop. This brine is essential for covering the cabbage and keeping oxygen out. You now have the beginnings of sauerkraut.
The next step is to pack the sauerkraut into crock or large glass jar. Make sure it is submerged under the brine. Cover it and let it sit at room temperature for about two weeks, checking it every few days to make sure there is no mold growing on top. If there is, just skim it off and discard. The sauerkraut will start to smell sour and pleasing. Test it after two weeks. If it tastes sour, salty, and alive, it’s done.
Store the finished sauerkraut in the fridge for up to a year.

How to Eat Sauerkraut
My all time favorite way to eat sauerkraut is to put it on a bunless all natural hot dog with mustard. It’s so good.
But since I don’t eat hot dogs all that often (especially in winter), my next favorite way to eat sauerkraut is alongside a salad. I make my salad, add the meat or eggs on top, add any dressing I use, and then put a good spoonful of sauerkraut on the side. I can mix in the sauerkraut with the rest of my salad. In this way, my salad has varied flavors and doesn’t get boring.
Other ways to eat sauerkraut include using it as a condiment on a sandwich, on a burger, on top of soup, and on top of eggs. Or, treat it like a supplement and just eat a spoonful a day.

Recipes to Pair with Sauerkraut
- Easy Italian Beef Burgers: Grilled up or broiled, these burgers make a great base for a spoonful of sauerkraut on top. Kind of like how I like to eat hot dogs, I would also add some mustard.
- Turkey Chickpea Soup with Wild Rice: Sauerkraut completes a lot of soups because it adds the salty, acidic flavor that takes any soup to the next level. Have you ever had a soup that was a little bland? Sauerkraut, along with some of the brine added at the end of cooking, can fix that.
- Asparagus and Peas Frittata: Eggs are great to pair with sauerkraut. A little bit alongside this frittata is a nice way to compliment the savory flavors.
Let me know if you give this sauerkraut a try! And tell me, what is your favorite way to eat it? Thanks for reading, and take care.
Rebekah


How to Make Your Own Sauerkraut
Ingredients
Equipment
Method
- Wash and core your cabbage by first slicing it in half and then cutting out the core. If using a food processor, slice the cabbage halves into strips and feed them through the food processor, using the slicing plate to finely chop them. Or, if not using a food processor, finely slice the cabbage into small pieces. My cabbage produced about 11 cups.
- Add the shredded cabbage to a large bowl. For 11 cups of cabbage (1260g), add 5 teaspoons (25g) of salt. Using clean hands, squeeze the salt into the cabbage. Squeeze and press, squeeze and press, until a brine develops. Keep squeezing and mixing until there is enough brine to submerge the cabbage underneath.
- Pour the cabbage and brine into a fermenting crock or a large jar. Make sure the cabbage is submerged (any that is not submerged will get moldy). Cover with a lid and let sit at room temperature for two weeks. Check it every few days to make sure there is no mold growing on top. If there is, skim it off.
- When the sauerkraut tastes good (it should taste alive and tangy), you can store it in the refrigerator for a few months.