
The Excitement of Starting from Seed
I was brimming with excitement to order my seeds in the mail and gather all the materials I needed to start my seeds, including trays, heat mats and soil. When the time came to finally open up those little packets, read the instructions and plant accordingly, I thought I would just burst. Click here to read about how to plant seeds in my previous post.
Today, however, we will look at what to do with those little seeds once they have been planted. We will cover the basics of what baby plants need to grow strong, including watering, covering, heat, light, thinning and hardening off.
Water
After your seeds are in their little cells of soil, you’ll need to water them. You can buy special watering cans that have teeny holes on the end. This allows a gentle shower of rain to fall on the baby seedlings and it doesn’t disturb them or push them too far into the soil.
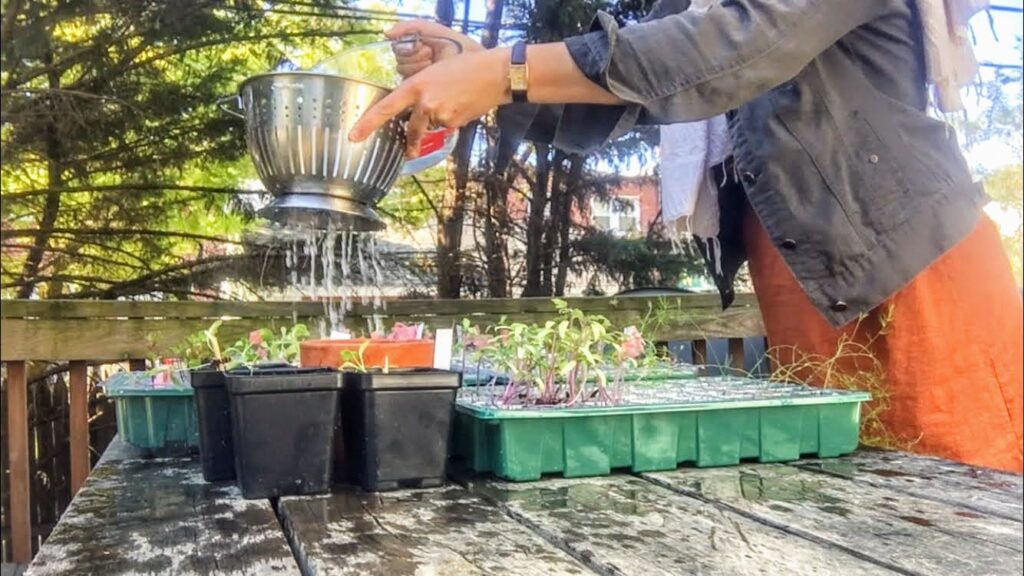
However, I never got around to buying that special watering can. Instead I created a hack that uses a colander and a pitcher. The colander has small holes on the bottom. I place the tray of seedlings in the sink, hold the colander over the tray and slowly pour a pitcher of water through. The seedlings get evenly watered and stay safe.
The soil needs to be kept moist but not soggy. I found that I only had to water about once a week because of the next important step we are about to look at.
Cover
Seedlings need to be covered. I like these trays that come with covers. Once the seedlings grow tall you can prop up the cover so the plant has room to grow. This will help keep moisture in.

If seedlings are left uncovered they will dry out quickly and will be exposed to drafts. While plants can recover from stressors such as dryness and chills, they don’t tend to be as strong or produce as vigorously. This is why it is important to keep the soil evenly moist and to protect the seedlings from chilly temperatures. Which brings us to the next point.
Heat
Unless you want to crank up your thermostat to 75-80 degrees (which I have heard of people doing!) it’s best to buy heat mats to keep your seedlings warm. This way they will have a consistent, even temperature that helps them to sprout quickly and get a strong start.
After most of the seedlings have sprouted and some have developed true leaves, you can unplug the heat mats. This will start the process of hardening them off, which I explain more about below.
Light
I chose to place my seedlings in front of a sunny, south-facing window that receives consistent sunlight throughout the day. There are sheer, light curtains in the window that I can pull back on cloudy days and let down on sunny days.

Seedlings like diffused light. If they are left in direct sunlight for too long, the leaves will burn and the plant will become weaker. Remember we talked about plants being able to recover but not being as strong later on? Too much sunlight too early is one of those factors that could weaken your seedlings.
If you don’t have a sunny window for starting seeds indoors, you can purchase grow lights. Grow lights are basically fluorescent lights that you can install above your seedlings. I didn’t have room in my budget this year, but I think I may buy them in the future. While my seeds sprouted and did just fine in the window, I think they would have gotten bigger had I used grow lights.
Additionally, I lugged up an old, rusty shelf from the basement to our dining room in order to have enough space to spread out my seedlings in front of the sunny window. I would just as soon have left the shelf in the basement, set up the seedlings down there and install grow lights above them. Perhaps next year.
Thin
When we plant seeds, we always plant 2-3 seeds into the same cell. This is because not every seed always sprouts. But when all seeds in a cell do sprout, we have too many. In this case we want to thin the seedlings.
Thinning seedlings simply means you pull out the weaker, shorter sprout and leave the strongest one. I used to hate doing this. I was throwing away a little plant life! I often wanted to keep all of them.
But thinning allows the strongest seedling to get enough of the nutrients it needs to grow stronger. After all, you want that seedling to eventually start giving you kale or tomatoes, right?
Harden Off
The last step in our process is where I have stumbled in years past. I used to plant my seeds, faithfully water them and then just plunk them in the sunlight and hope for the best. Imagine turning a baby out into the real world with no special care? That’s kind of what it’s like to grow seeds and then stick them in the ground with no gradual transition.
At least ten days before we plan to plant the seedlings, we will need to start moving them outside for little bits of time to help them acclimate to the harshness of the great outdoors.

Wait for a day that is above 45 degrees and not too windy. Start off your seedlings in the shade and leave them outside for just an hour. Bring them back in. The next day, increase the time outside to an hour and a half. Little by little, leave the seedlings out for an hour or so longer, varying between shade, sun, and part sun. Remember to bring them inside at night, as well as if the temperature drops, the wind picks up a lot or a heavy rain comes.
Once you have gone through this process for ten days, your seedlings are ready to plant.
Go For It!
And now all that remains is for you to get started. You can do it! You have the plan, now you just have to gather your materials and go for it!
Don’t be afraid to try. You can turn your land into food. I’m here with you all the way.
See you next time!
Rebekah
So glad that we were able to see the seedling operation in person. Looking forward to seeing the fruits (and vegetables) of your labor. Great job on the blog.
Thanks! It’s both exciting and scary to begin, and I can’t wait to see how everything grows.
Your blog very interesting to read, and enjoy seeing the photos. Will sure look forward to seeing future photos showing how the seedlings are coming along.
Thanks so much!